
Shoppers Payment Flows
Introduction
With your Wero digital wallet, you have all you need to make electronic-commerce (e-commerce) and mobile-commerce (m-commerce) payments across a full range of use cases (reduced availability at the moment).
Merchants can accept the Wero digital wallet in e/m-commerce flows by integrating the wero button onto the checkout page of their web shops. The wero button links the merchant’s web shop to your Wero digital wallet and therefore to your account-to-account payment flow.
With your Wero digital wallet, you can make e/m-commerce payments directly from your own bank with all the ease and efficiency that you expect from a modern, state-of-the-art payment method.
You are also always protected when you complete a transaction with wero, thanks to wero consumer protection. If you encounter an issue with one of your Wero transactions, you can easily file a report and get assistance from within your Wero digital wallet.
Both Apple iOS and Android are supported.
What you can do
- e-Commerce: Shop on your desktop device
- m-Commerce: Shop on your mobile device
UX flows and prototypes
Illustrations of the flow of screens for e-commerce and m-commerce payments are available as a prototype.
Before payment
Merchants who have integrated wero into their web shop can accept the wero digital wallet as a payment method at the web shop checkout. You know that the Wero digital wallet is a supported payment method by the presence of the Wero button among the payment options at checkout.
e-Commerce
Paying with Wero for the first time in a web browser
Establishing a connection with your Wero digital wallet.
To pay with Wero for the first time in a web browser, you must establish a connection between the merchant’s web shop and your Wero digital wallet. You can make this connection in one of the following ways:
- By scanning a QR code with your Wero digital wallet
- By entering an alphanumeric code in your Wero digital wallet
- By scanning a QR code with your mobile device's camera app
Scanning a QR code with your Wero digital wallet
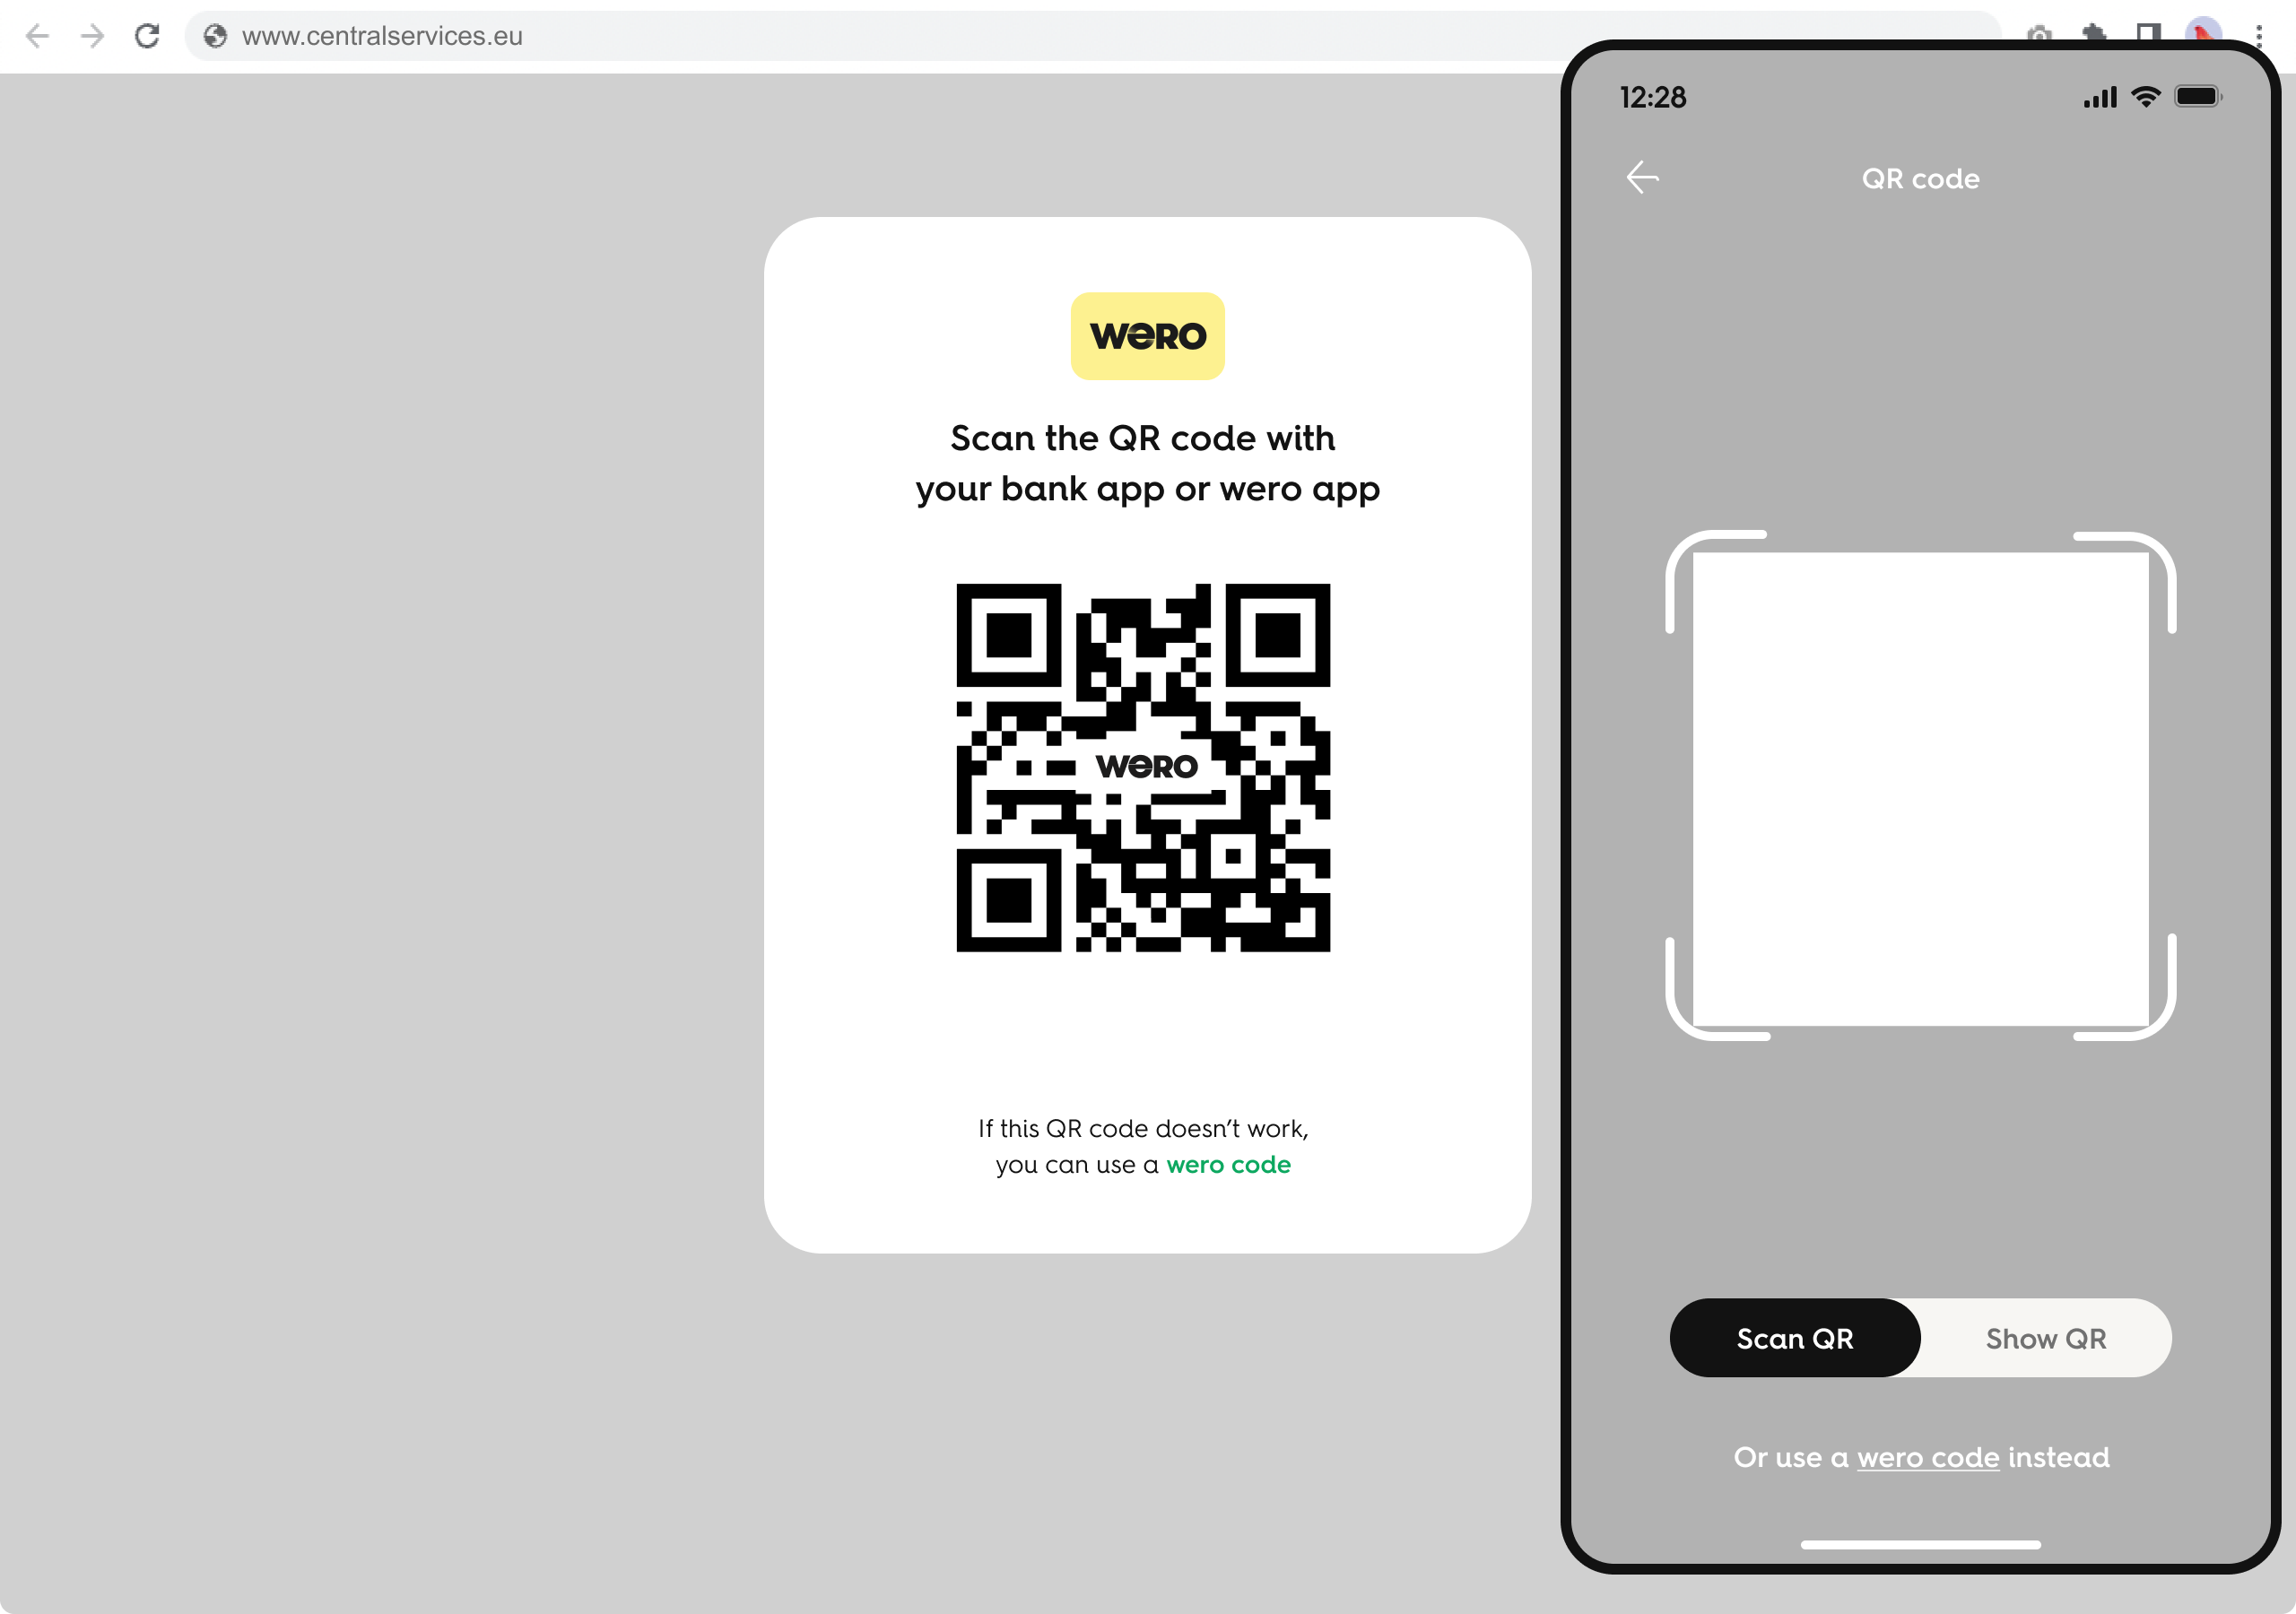
If you are shopping on a desktop/laptop device, you can make the connection between the merchant's web shop and your Wero digital wallet by clicking Wero on the checkout screen and using your Wero digital wallet to scan the QR code that is displayed.
You can scan Wero QR codes by tapping the QR-code icon in your Wero digital wallet. If the wallet is integrated into the mobile banking app from your bank, the design of the QR-code scan functionality might look different from that in the standalone Wero digital wallet app. However, regardless of the type of Wero digital wallet you use, this functionality is presented to you in a prominent position for quick and easy access. The QR-code scan functionality is displayed on one of the following screens:
- ’Level 0’ screen (the launch screen of the app, before consumer authentication)
- ’Level 1’ screen (the first screen after consumer authentication)
After you scan the QR code, the wero digital wallet displays the payment overview of your purchase. (See also Landing pages and redirects for signing consent.)
Entering an alphanumeric code in your wero digital wallet
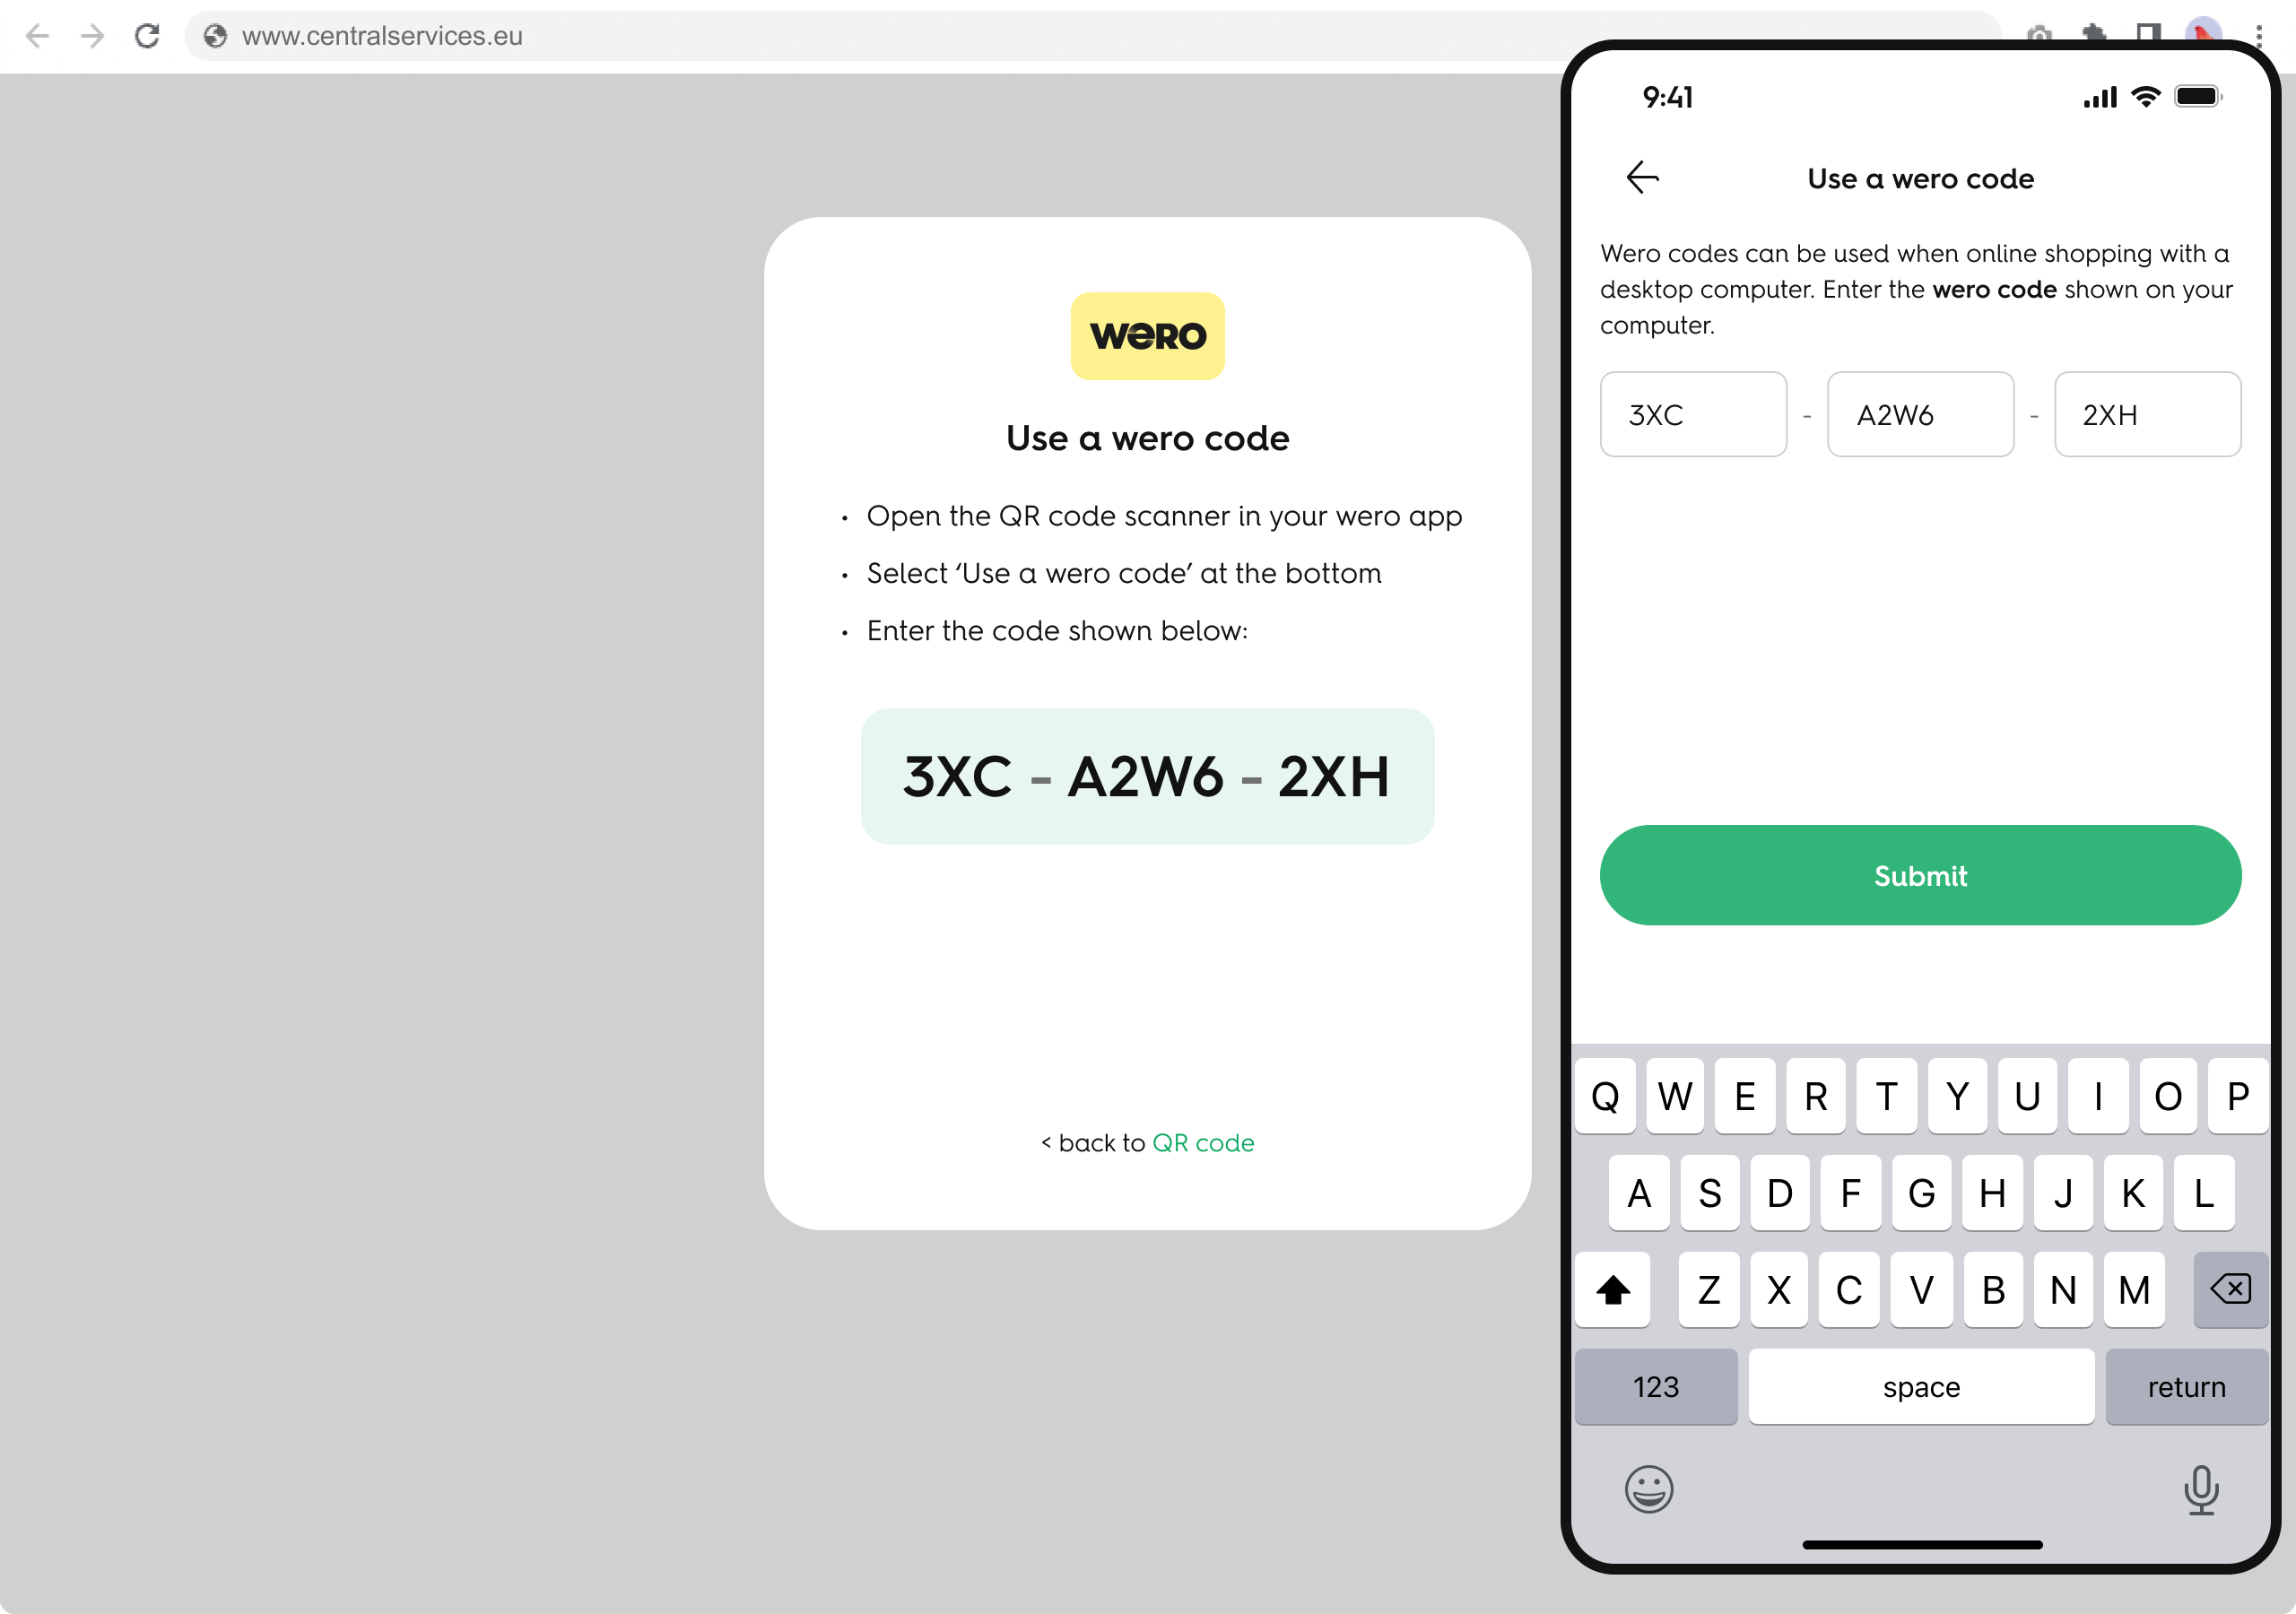
Instead of scanning a QR code, you can can complete the following steps:
- On your desktop/laptop device, below the QR code, click Pay with a Wero code. An alphanumeric code (for example, 3XC-A2W6-2XH), also known as a Wero short code, is displayed.
- Enter the code in your Wero digital wallet. The Wero digital wallet displays the payment overview of your purchase.
Scanning a QR code with your mobile device's camera app
Alternatively, you can scan a Wero QR code with your device’s native camera app. You are then redirected to the Wero landing page on your mobile device and can continue the payment from there. If you have several Wero digital wallets installed on your device, you select the wallet to be used for the transaction. The experience of this user journey will be the same as that for an m-commerce payment.
Opening and unlocking your wero digital wallet
Continue with the payment by authenticating yourself in your Wero digital wallet. The authentication process is quick and easy and makes use of the biometric capabilities of your mobile device.
Payment overview
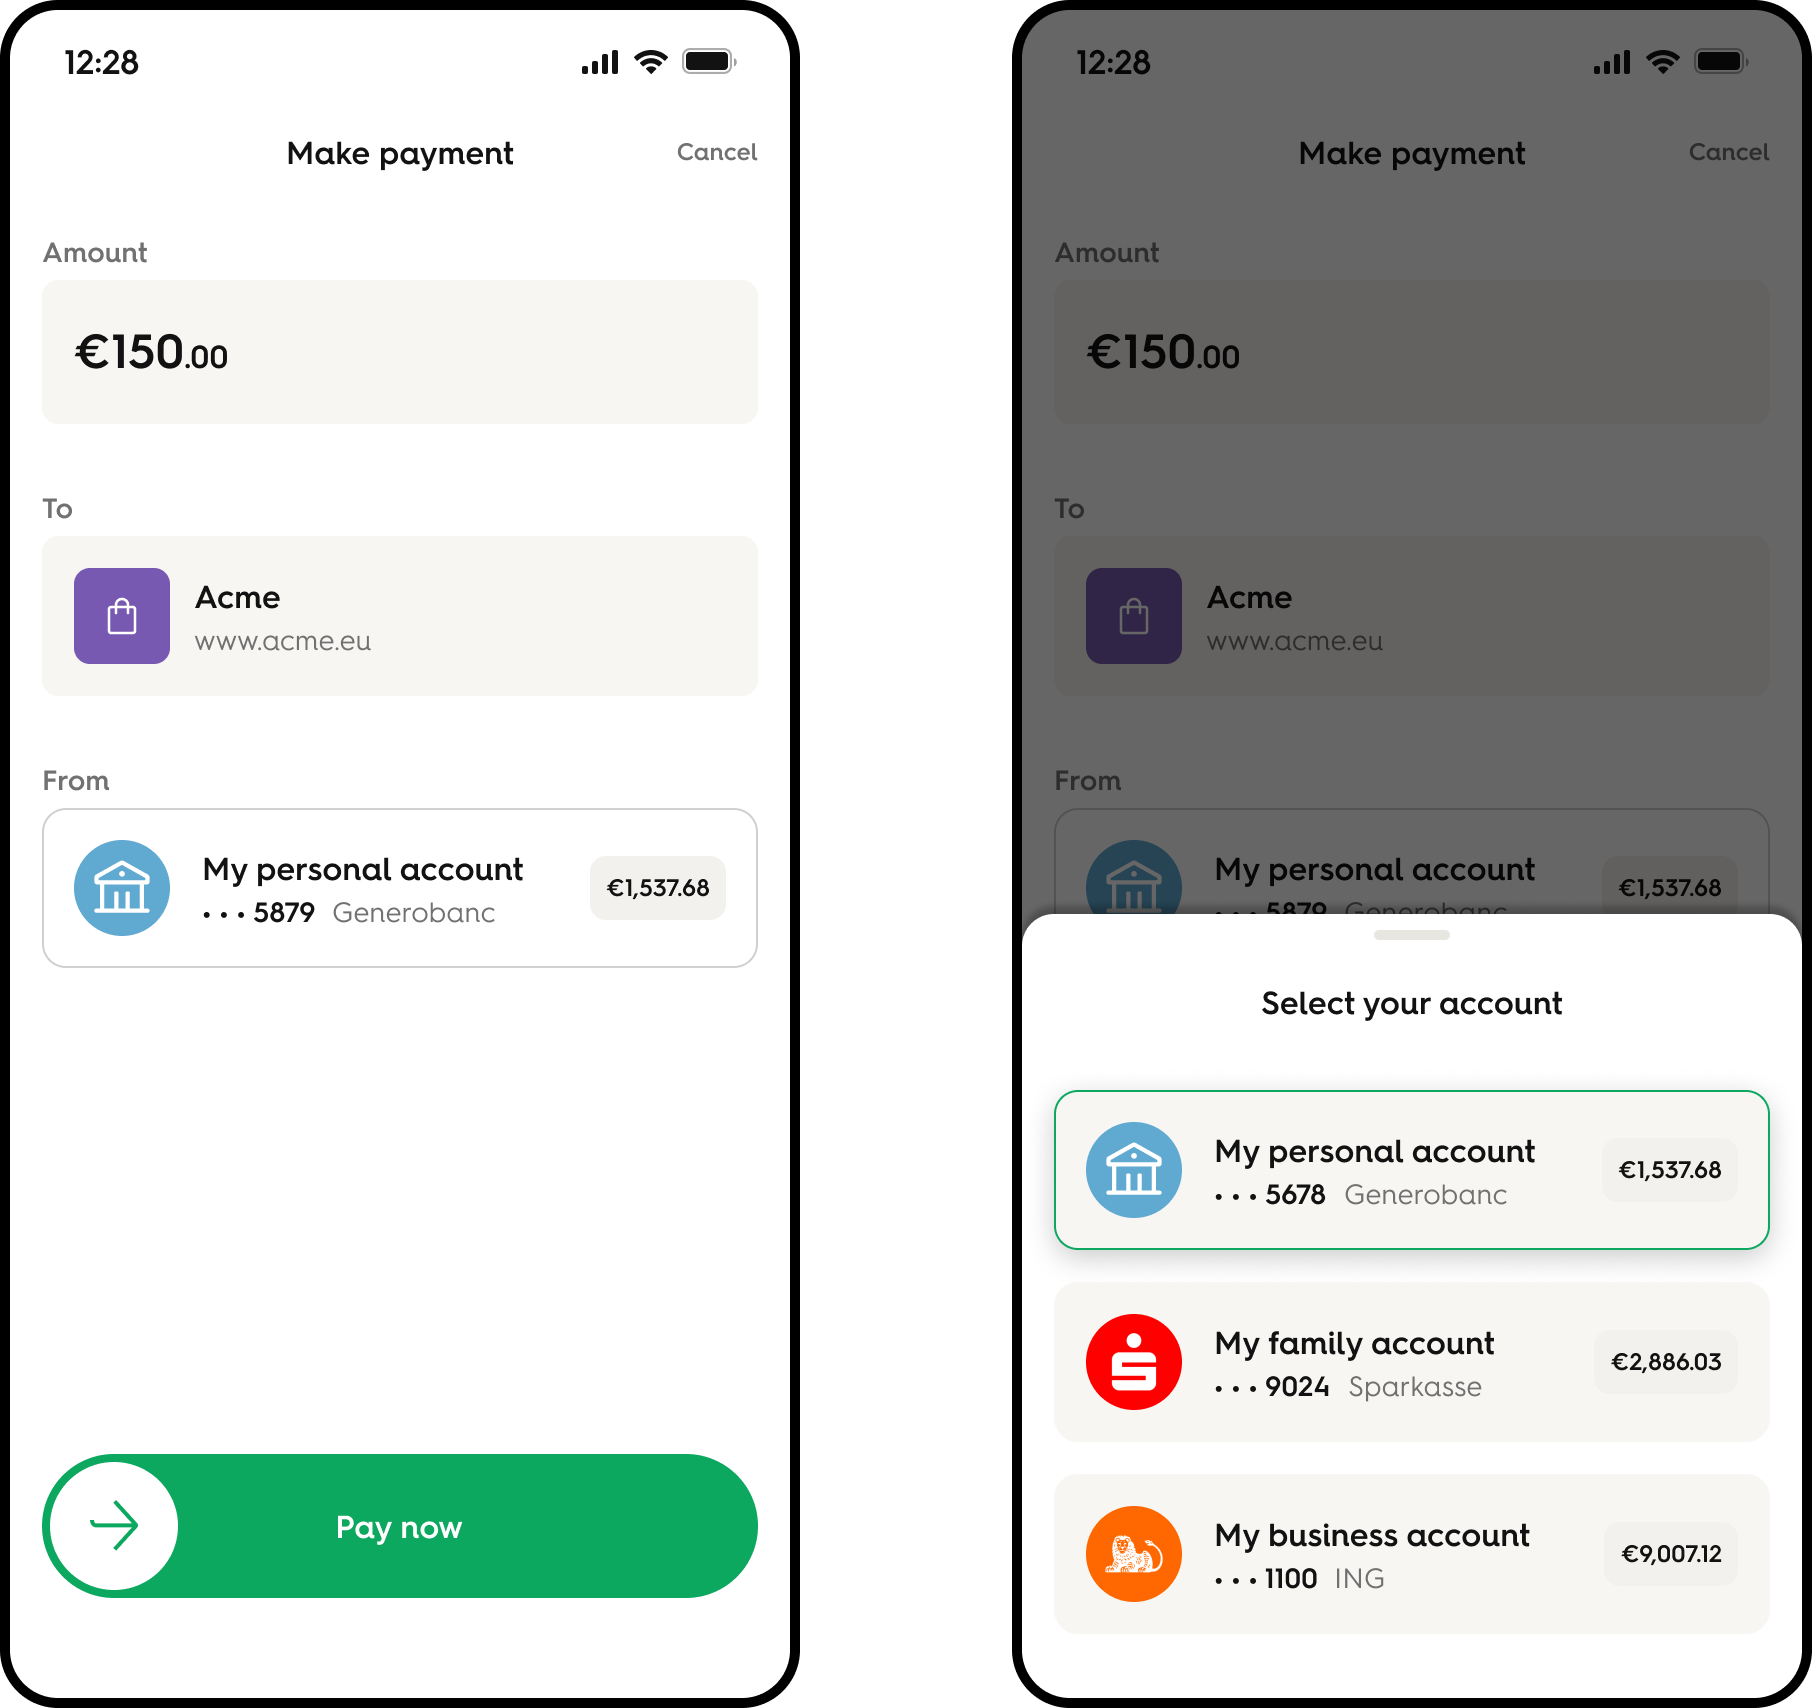
After you unlock your Wero wallet, the payment overview is displayed. The overview includes the following items:
- Account from which the transaction is to be paid
- Account balance
- Option to change to a different account
- Information about the merchant, such as the shop name and logo.
- Transaction amount
- Pay Now slider for finalising the transaction
- Possibly, a Buy now, pay later (BNPL) suggestion from your bank
Confirming payment
Confirm the transaction by sliding the Pay Now slider.
- A confirmation notice is displayed in the wallet.
- Confirmation of the transaction is also displayed in the merchant’s web shop.
- The transaction will also be listed on your account activity page in your Wero digital wallet.
Paying with wero again in the same web browser
If you already paid with Wero once (when you shopped in a particular browser on a particular device) and if you allowed the browser to remember your Wero digital wallet, you are not required to scan a QR code again for further purchases in that browser. Instead, you automatically receive a notification on the mobile device of the Wero digital wallet that you used for the first payment.ment.
Continue the transaction on that mobile device. (See Receiving notifications below.)
Receiving notifications
After you establish a connection between the merchant’s web shop and your Wero digital wallet, you receive a notification on your mobile device that requests you to complete the transaction for your e-commerce purchase.
Click the notification. You are redirected to your Wero digital wallet on that mobile device.
m-Commerce
You can pay with Wero in any merchant mobile app or browser that displays the Wero button at checkout. To pay with Wero, click Wero. You are redirected to your preferred Wero digital wallet for user authentication and payment completion. The payment flow in the Wero digital wallet is the same as described earlier for e-commerce payments.
Wero landing page
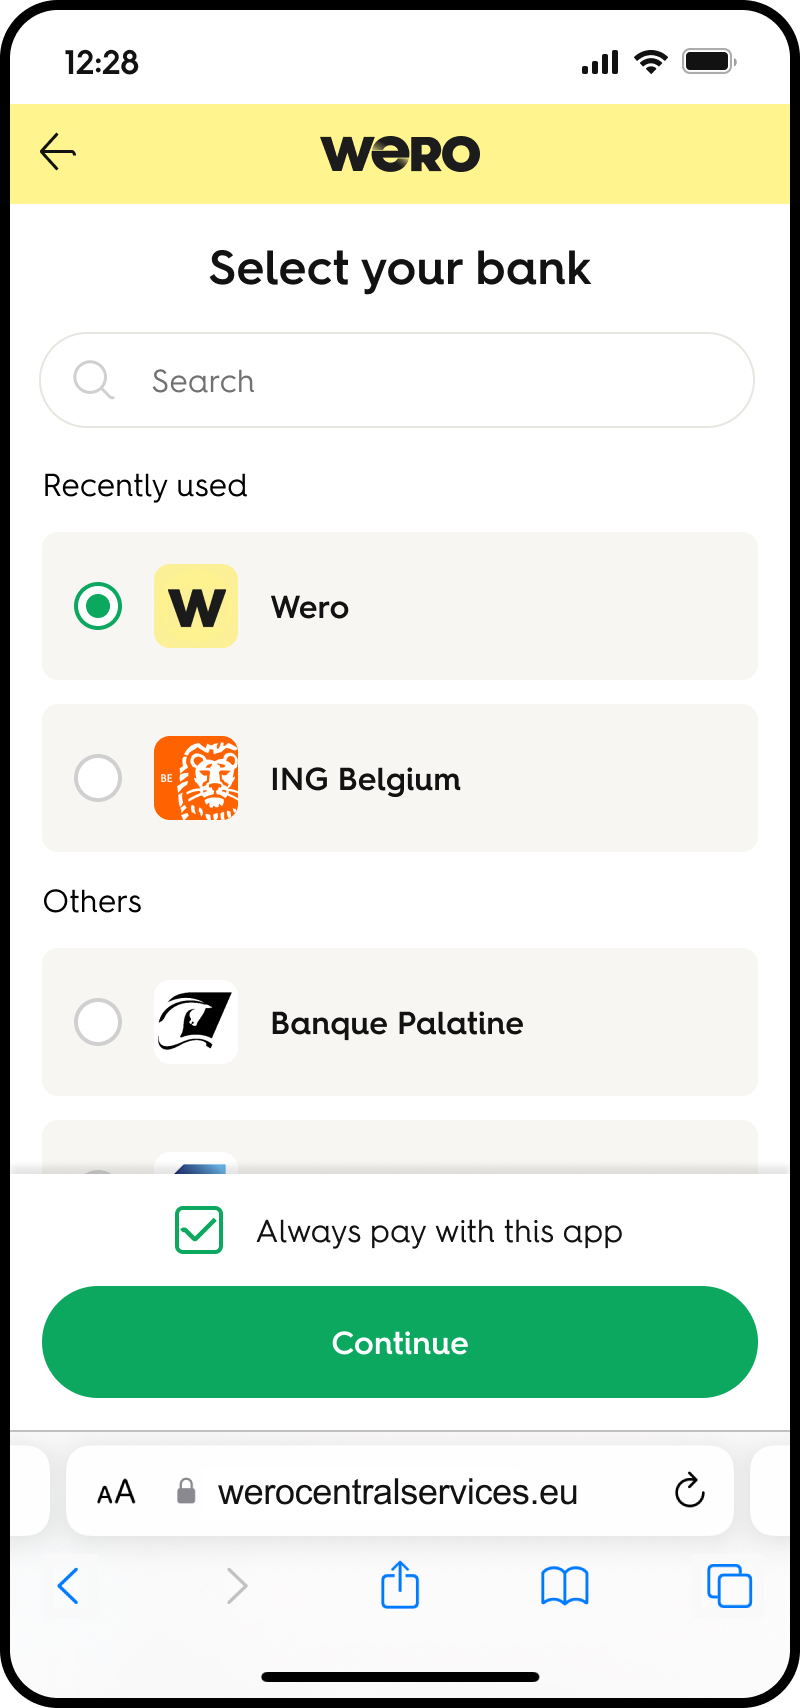
If you have never paid with your Wero digital wallet or if the information for connecting to the wallet is no longer stored on your device as a cookie, you must specify the Wero digital wallet that you want to use for the transaction. In some cases, for example, when you shop on the same device that contains your Wero wallet, you might not be able to scan a QR code to specify the wallet. In such cases, you are redirected to a Wero landing page that lists the mobile banking apps that support Wero wallet functionality, including the standalone Wero digital wallet app. Select the app that you want to use for the payment.
Always open this app
If you click Always remember this app in the wallet, cookies are set so that, the next time you click Wero in a merchant’s app, you are automatically directed to the selected Wero digital wallet.
Highlighted apps
If you do not click Always remember this app in the wallet, the next time that you initiate a payment with Wero, your previously used apps are displayed at the top of the page so that you can quickly continue with the payment.
Activity
Transaction overview
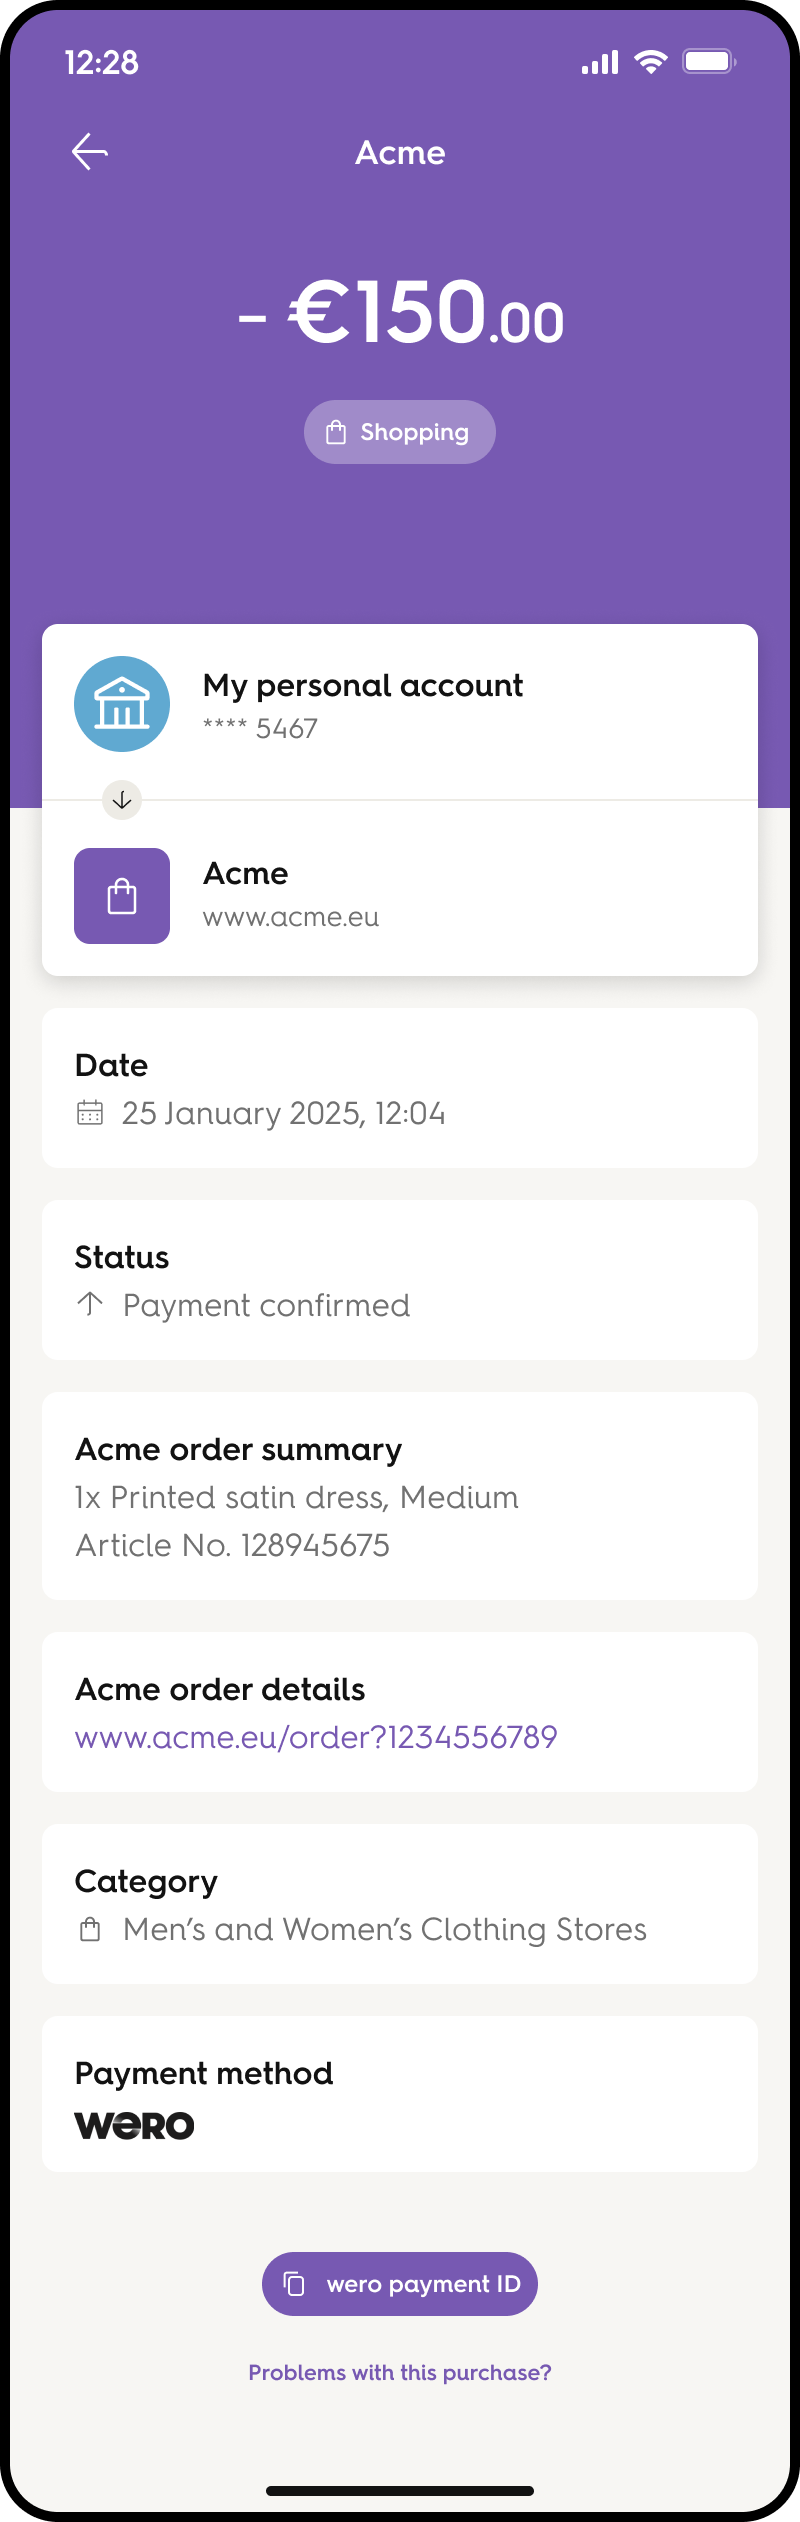
Paying with Wero means that you always have control over your payments.
You can consult your past and pending transactions for every account that is connected to your Wero digital wallet.
For full transparency, all the transactions for an account are displayed—not just the transactions that were made with Wero.
Updated about 1 year ago